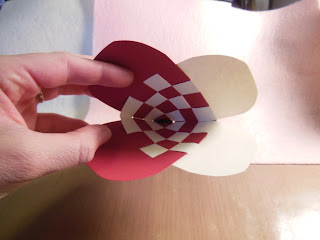
This year for Valentine's Day I am making Danish Heart Baskets (typically made for Jul (or Christmas) in Denmark). Last night at work I found myself utterly bored out of my mind with my co-workers and decided to start making a heart basket. None of them had ever seen it before, and I always thought everyone knew how to make them. They're very simple once you get it down but it can take a few times before you get it right. At least that's what I learned from teaching one of my co-workers who wanted to learn how to make them last night. But after a couple of tries he was able to make them on his own and they looked better than mine!
My grandma was born in Denmark but moved to the U.S. when she was still a baby. Her parents carried on many Danish traditions and over the years she has shared some with me. I can remember making these baskets with her when I was young, probably five or six, and we always make then in red and white glossy paper. The flag of Denmark is red and white so that's where the tradition came from. But I've seen other colors used, typically red is one of them though.
MAKING THE BASKETS:
The first row is the easiest to weave, with the last being the hardest. This has to do with the fact that you have so much more room for your rows to move around in the beginning but as you near the end you have virtually no wiggle room. There are a few different ways to make the hearts to get differing patterns but I will show you the more basic of the designs. Using three rows is the easiest to begin with, I believe that is what I was initially taught with. Then you can add four or five rows. They get more time consuming and harder to weave as you increase the row amount. I will show you a four row Danish Heart Basket using red and white construction paper.
Start with two long ovals folded in half and cut 3 strips into each one starting at the fold and going towards to rounding top. Make sure your cuts are AT LEAST as long as your oval is wide (otherwise you won't be able to weave all of your rows and make them fit).
*Remember your ovals are folded in half and cut, so there are TWO layers to them when they're folded. This is how you are able to weave the strips IN and OVER of each other to make a basket that will open up at the end. Be sure to weave IN and OVER, not just over and under.*
Take your white oval and open up the first strip and put it OVER the(1st) red strip (red is INSIDE the white).
Take the same white strip and thread it IN BETWEEN the (2nd) red strip.
Take the same white strip and put it OVER the (3rd) red strip (red INSIDE white).
To finish your first row, thread your white strip IN BETWEEN the last (4th) red strip.
Then scoot the entire first row up to make room for your next row.
Take your 2nd strip of white...
Thread it INSIDE the (1st) red strip (white INSIDE red)
Take the same (2nd) white strip and put it OVER the (2nd) red strip (red IN BETWEEN white)
Take the same white strip and thread it IN BETWEEN the (3rd) red strip (white INSIDE red)
To finish the second row, put the white strip OVER the red (red INSIDE of white)
This is what it will look like after the 2nd row is complete
For the 3rd row, take the 3rd white strip and put it OVER the 1st red strip ( so that red is IN BETWEEN white)
Take the same 3rd white strip, and thread it through the 2nd red strip (so white is IN BETWEEN red).
Then continue the pattern weaving in and out to finish the 3rd row.
3rd white over red (so red is in between white)
3rd white in between red (so white is in between red)
Now to start the last (4th) row:
Thread the last (4th) white strip through the 1st red strip (white IN BETWEEN red)
And then continue the pattern:
White strip over 2nd red
White strip through 3rd red
White strip over 4th red
(This is right before you thread the last white strip over the 4th red strip)
This is your final product!
You should be able to open it up and fit some goodies inside now!
You can add a thin strip from the middle of each side of the Heart Basket with adhesive so that it can hang.
Hope this tutorial is easy enough to understand. Happy Crafting, and Happy Valentine's Day!


No comments:
Post a Comment