Wednesday, December 21, 2011

Bottle Memos

Planning on giving someone a bottle of wine, sparkling cider, or something else in a bottle?
This is a quick and easy way to dress them up.


Just cut a rectangle big enough to cover the width of the bottle down as far as you want the bottom of the tag to reach. Then score the top third of the paper and cut a circle out of that big enough to go over the top of the bottle and sit where the bottle begins to widem. Cut out 2 rosettes using TH mini rosettes dies, glue together, and add pearl accent. Cut out a rectangle to fit the inside of the bottom half of the tag with coordinating paper, and then one slightly smaller to fit inside of that. Give them fishtails. Stamp a sentiment on CS and cut out and emboss using SB Ribbon Banners. Glue all together as you see and add Pearl Accents.

The rosettes take the most time in this project, otherwise it's super quick!

This idea can also be found at http://limescraparitawithatwist.blogspot.com/ on Dawn W.'s blog


(PS This was supposed to be posted like a week before Christmas but apparently the computer didn't want to cooperate. It's still a great idea for next year or any other occasion besides Chritmas.)

Sunday, December 18, 2011

Flowering Trees

NEW! At Picture This

Memory Box Dies

This die is called "Flowering Christmas Tree"


I used it with metallic black CS and textweight, embossed with CB Kassie's Brocade embossing folder.
The card on the right has some ribbon thrown around the bottom and Liquid Pearls in the center of each flower.
The card on the right also has silver mirrorcard embossed.

Saturday, December 10, 2011

Susan Louise Ornaments

Original idea borrowed from Annette: http://annettes-kraftykats.blogspot.com/


Just take clear plastic ornaments, Susan Louise acetates, a Spellbinders circle, and some fake snow or white Flower Soft and you have an easy ornament!

Monday, December 5, 2011

Folded Paperback Trees

To add a little holiday flare to your home, check out this idea!


  1. Tear the front and back cover off of a paperback book, but leave the binding intact.
  2. Fold the top corner of the first page down to meet the binding.
  3. Then fold the same page down to meet the binding again.
  4. Turn up the resulting triangle at the bottom of the page so it's even with the bottom of the book.
  5. Make these same three folds on the next pages of the book until the tree looks proportioned enough (about 150 pages). If your book is longer than that just trim the excess pages off the binding.
  6. Glue the first and last pages together so the tree fans out and stands on its own.
  7. Decorate anyway you want: ink the pages with distress ink or mist with metallic sparay paint, add Candi dots for ornaments, or decorative ribbon as garland, and to top it off make a tree topper (I didn't know what to do for mine)
This idea was found in Family Circle magazine December 2011 issue.

Monday, November 28, 2011

Elegant Christmas Ornament

Did you know that you can do more with your spellbinders than just make cards? With Christmas around the corner handmade ornaments can be great presents. If you're more of a paper crafter than a handy crafter, you can still make handmade ornaments using your spellbinders rather than glass ornaments and paint.

For this ornaments I cut out 6 pendant shapes using SB Contemporary Hearts Pendant. I used two of the dies that came with this set- the bigger outter one and the smaller inner one (which I placed in the middle to cut out the interior of each pendant). These pendants aren't symmetrical when you turn them over back to back, so I decided to also cut out a circle with the center cut out to place behind the heart cutouts of the pendants (white portion of the ornament). I adhered the white circles to the back of the pendants and then scored the pendants in half, and adhered them back to back to each other. Before I adhered the last one to the others, I taped down the chain with the bead in the center.

To finish the ornament, I added a clasp to the top of the chain that attaches to silver twine. I also added more beads to the bottom of the ornament.

Friday, November 25, 2011

Christmas Trees!!

(I totally took this idea from Dawn W. So check out her originals. )


Using Tim Holtz Mini Rosettes Die I cut out 4 rosettes (2 small, 2 medium) out of a patterned green paper, accordion folded them and glued the ends together. Then using hot glue I glued the tops togther at the slant I wanted and glued them all together to make a 4 tiered Christmas tree. I stuck a Tim Holtz pin on the top tier and monogramed a circle die. I glued the finished tree into a terra cotta pot to make a cute little holiday gift.

Wednesday, November 23, 2011

Cone Ornaments


These ornaments were created based upon one I saw while shopping the other day; I've seen the concept several times but finally decided to create some.

They were really quick and easy to make. 


Just cut a semi-circle out of your favorite 6x10" Christmas paper.
Roll it into a cone and secure the edge with adhesive.
Using Tim Holtz Mini Rosette dies and a coordinating paper to your cone, cut a Rosette.
Cut a strip of paper to go across the middle of the cone, about 1.5"x4".
Attach the Rosette to the cone with a strong adhesive.
Punch a hole in the side of the cones about a half inch down and tie twine, ribbon, or picture hanging wire to make a hanger for the ornament.
Using a glue gun, attach some shredded paper to the inside of the cone leaving enough space to fit a little treat inside the top.


Monday, November 21, 2011

Easy Christmas Ornaments


All you need is some pretty Christmas paper, SB Circles Die or Ovals Die, and some twine.


Just fold in half at least 6 circles/ovals and glue together with twine loop in the middle


To top this one off I added a CB Quilled Daisy to the top in metallic text weight and a piece of ribbon around the bottom of that.

Saturday, November 19, 2011

The Monthly Market @ Banbury Place Bldg 13

       Today my mom and I went shopping downtown because we had to check out a new store located inside the Banbury Place. It was super cute, filled with homemade pape crafts, vintage furniture and mirrors, and cute gift ideas. I happened upon a vintage vanity, a vintage chalkboard, and an owl ornament for my grandma. I want to show you my finds! I also will be sharing a new ornament project I've created based on something that I saw hanging on a tree at the store.


The Vanity


&


Chalkboard


Friday, November 18, 2011

Fab 5 Day 5- Flower Soft

Flower Soft
I've never played with this before so it was an experience


Polar White Flower Soft
SB Blossom and Tag Accents
SB Ribbon Banners
SEI 12x12

Check out my other Fab 5 girls this week!


Thursday, November 17, 2011

Fab 5 Day 4- 3D Project


PROJECTS


Christmas Ornaments


AND


Christmas goodie bags

Both made using Imaginisce 12x12 (#003361) cut out with SB Standard Large Circles and Large Scalloped Circles.
Additional supplies used: SB Blossom Tags and Accents, CB Brocade folder, CB Snowflake folder, clear purse, mirrorcard, twine (natural and silver), Aqua/lime green/true red cardstock

Check out my other Fab 5 Girls and their projects for the week!

LEANN


Wednesday, November 16, 2011

Fab 5 Day 3- Susan Louise

Susan Louise
You might be wondering who or what is Susan Louise. Susan Louise has this awesome line of prints on acetate and cardstock. They're very realistic looking and range from things like fish, moose, birds, santas, and shells.


I used the moose from this company to create a Christmas card.


SB Labels 18
Tim Holtz/Sizzix On the Edge Die (Snowflakes)
Poinsettia paper flower
Imaginisce 12x12 (#003358)

Tuesday, November 15, 2011

Fab 5 Day 2- Spellbinders

Spellbinders

My favorite things in the world!

This year they came out with the best Spellbinders for Christmas.

I put two of them together, the Poinsettia and Flower Pots:


Paper: Authentique: Wonder: "Yearning"
Embossing: CB folder "Brocade"

Monday, November 14, 2011

Fab 5 Day 1- Judith

Judith
Yes, Judith again. You know you  love her.

Day 1 is a super simple Christmas card.


Just take white cardstock cut to 11x5.5" for  the card base. And another piece of white cardstock to 5.25x4"; stamp Judith "In the Winter We Can Build a Snowman" stamp with black ink and color with Copics, emboss this piece with Tim Holtz/Sizzix Snowman Embossing Folder, and distress the edges with Tim Holtz Walnut Stain Distress Ink. Stamp the inside with Judith "Merry Christmas" stamp in black ink.

Super easy Christmas card made in less than 5 minutes. Seriously.


Sunday, November 13, 2011

Fab 5 Starts Tomorrow

That's right! Fab 5 begins tomorrow. I hope you're ready for a ton of new Christmas ideas!

And enjoy this picture of BOB the cat.
It's my new cat.
And she's a girl.


Sunday, October 23, 2011

Goodie Bag

For anyone who doesn't know, Picture This has these clear purses that you can dress up. I finally decided to purchase one and play and oh my goodness! It was fun. You know all those extra scraps or diecuts from accessory sheets that you have no idea what to do with them? Perfect for this!! Because the holidays are coming up I decided that this project would take on a Christmas theme.

For this project I used :
Clear Purse
My Minds Eye: Colorful  Christmas Collection Accessory Sheet
Punk Paislee: Snow Day-Fireside


I made a template for this project of the front of the purse (also the back so cut x2 if you want the back covered), a template for the sides (x2), and one for the handle (I did this x2 as well but you dont necessarily need to). (This was all a lot of trial and error because I didn't want to take the purse apart for a template although that would work much better!)

Once my pieces were cut from the template assembling was super easy! Then all I had to do was accessorize the purse to fit the occasion. I like the results of this project so much I think I'll have to get more purses and make Christmas goodie bags for a lot of people. They're the perfect size for candies, hot chocolate mixes, or little toiletries like lipgloss or hand sanitizer. 


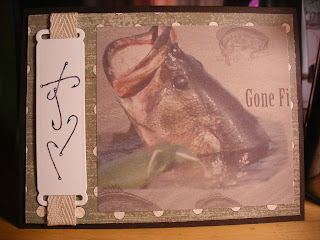
Gone Fishing!

For the Guys


There's no sentiment inside of this one, I felt that it's easier to just leave a card open ended if it's going to be given to a guy. That way when it's time to give the card away, you just have to write your own sentiment inside.

Supplies:
Graphic 45 Playtimes Past Collection (b/g)
SugarTree- Steves Pages (fish)
Susan Louise Minis: Fishing Set 1 (hooks)
Spellbinders Ribbon Tag Trio
Ribbon
Cocoa cardstock

Friday, October 7, 2011

Fab 5- Day 5 TIM HOLTZ


G45 Once Upon a Springtime
G45 Fashionista
Tim Holtz Mini Rosette Die
Tim Holtz Walnut Stain Distress Ink
Tim Holtz Dress Form
PRIMA Brick clear stamp
"Amy Smith" stamp

I've been seriously overusing Tim Holtz Mini Rosette Die; I'm sorry. I recently purchased it and it's just so much fun to use!!

Thursday, October 6, 2011

Fab 5- Day 4 MFT

MY FAVORITE THINGS

Well I was just so taken by MFT that I had to create two cards today to show off for Fab 5!

Card 1:


Spellbinders Tag Trio 2
Spellbinders Labels 5
My Minds Eye Stella Rose
My Favorite Things- Pure Innocence "Popping By" Stamp Set
Martha Stewart Edge Punch
Copic Markers (sorry I don't know what colors!)
Misc. brads from Picture This's "Buffet Table"
Paper Flower Embellishments
Glossy Accents (the popcorn, soda, and her shoes)


Card 2:


Pebbles Inc. "Ever After" Paper Collection (flags)
Three Bugs in a Rug "Mini Floral" paper (green plaid)
WorldWin Light Orange Dream paper
EK Success Scalloped Edge Punch
My Favorite Things- Pure Innocence " Pucker Up" Stamp Set
Copics (sorry again, I didn't record the colors!)
Glossy Accents (Lemonade pitcher and glasses)


Wednesday, October 5, 2011

Fab 5- Day 3 BLING

BLING

For a while, bling was a dirty word in my vocabulary, at least when it came to cardmaking. I am called the distressed girl after all, and how can you use bling and distressing in your creations?! I asked myself this question and found the answer and I LOVE IT! :)

I was so pleased with how bling blended into my creations I had to made two cards!

Card 1:


Graphic 45 Fashionista
Graphic 45 Transatlantic
Graphic 45 A Proper Gentlemen Tags
Graphic 45 Steampunk Tags
Spellbinders Labels 4
Tim Holtz Mini Rosette Die
Tim Holtz Walnut Stain Distress Ink
Cosmo Cricket Alphabet Stickers
Card 2:


Graphic 45 Steampunk
Tim Holtz Mini Rosette Die
Tim Holtz Walnut Stain Distress Ink
Spellbinders Labels 5
Cosmo Cricket Alphabet Stickers
Wooden Bingo Chip (from Picture This's Buffet Table)


(The answer for me was pearls as bling!)

Tuesday, October 4, 2011

Fab 5- Day 2 Spellbinders

I've got to say that I love Spellbinders! They're so versatile and add so much dimension to cards it's unbelievable.


In this card, I used Spellbinders new die set "Blossom Tags and Accents" available now at Picture This along with alot of other really great dies. I also used "Standard Large Circles".


This butterfly is not however Spellbinders, it's a new company called Cheery Lynn Designs and this particular butterfly is from the "Exotic Butterfly 2" package. However, Spellbinders does have some great Shapeabilities butterflies that look very similiar. This links to one, two, and three different Spellbinders products that are similiar to this butterfly.


And lastly, the embossing folder that I used was Cuttlebug's "Textile" for the background and the circle in the middle.

Monday, October 3, 2011

Fab 5- Day 1 Judith


Ah...Judith. We meet again. Only this time it is colder, therefore a season appropriate card is to be desired. Large Stubbies from your collection are the perfect thing to add a touch of fall and halloween to a card, in this case I used Oak Leaf, Bat, Spider, and Frog. I colored them in with Copic Markers, and for the inside of the card there's a "Happy Halloween" Stamp that's perfect.

Thursday, September 15, 2011

Be Fearless: You are Beautiful

Graphic 45 Botanica Bella
Graphic 45 Steampunk Tags
Graphic 45 Curtain Call
Spellbinders Labels 4
Spellbinders Labels 18
Tim Holtz Mini Rosette
Tim Holtz Walnut Stain Distress Ink
Cosmo Cricket Alphabet Stickers


Tuesday, September 13, 2011

Time To Shift Gears

I thought that this card could be given to someone who is going through a hard time or making a big change in their life.

Graphic 45 Steampunk
Tim Holtz Mini Rosette
Cosmo Cricket Alphabet Stickers
Glossy Accents

Monday, September 12, 2011

Dream Like a Butterfly does...

Graphic 45 Botanica Bella
Graphic 45 Steampunk
Tim Holtz Mini Rosette
Tim Holtz Walnut Stain Distress Ink
Spellbinders Labels 4
Spellbinders Label 18
Hampton Art Sentiment
Prima Brick Clear Stamp